Cost of Tiling a Bathroom
Want to know how much tiling your bathroom will cost? Below you'll find a breakdown of prices for different bathroom tiles, as well as how much a tiler will charge to do the job.
£750
How Much Does Tiling a Bathroom Cost?
Getting the right look in your bathroom can add value to your home. When buying a house no one wants, to have to redo the bathroom. Whether it is part of a whole bathroom refit or just a refresh of the room, tiling can be big, but a worthwhile job.
The cost of tiling a bathroom varies a lot. The main factors are the area you want tiling, the type of tiles you choose, and who you hire to do the job. The average cost to fully tile a bathroom is between £500 and £800. This includes the cost of the materials (tiles, grout, and adhesive) as well as the cost of labour.
Because there are so many factors that affect the price, you will have a lot of decisions to make. When making your decision remember that the bulk of the cost comes from the labour, as tiling can be a fiddly job to get right.
Bathroom Tiling Prices
There are several factors that will affect the total cost of tiling your bathroom. The first is the area that you choose to tile. The most expensive option is to tile the whole room; tiling the floors and the walls top to bottom. The cheapest option is to just tile above the sink. The next consideration is the material that the tiles are made from. There is a big difference between the cost of vinyl tiles and natural stone tiles. The size and shape of the room will have a large impact on the cost of not only materials but also labour. The more the tiles have to be cut, the more difficult and thus, expensive the job. Here are some example costs with some common job types.
| JOB DESCRIPTION | TILE TYPE | AVERAGE SUPPLY AND INSTALLATION COST |
|---|---|---|
| Fully Tile a medium-sized bathroom, walls and floor | Ceramic | £900 - £2,050 |
| Fully Tile a medium-sized bathroom, walls and floor | Granite | £2,600 - £3,050 |
| Fully tile the walls of a medium-sized bathroom | Ceramic | £750 - £1,600 |
| Fully tile the walls of a medium-sized bathroom | Granite | £2,050 - £2,400 |
| Tile the floor of a medium-sized bathroom | Ceramic | £150 - £450 |
| Tile the floor of a medium-sized bathroom | Granite | £550 - £650 |
| Tile around the bath only | Ceramic | £375 - £800 |
| Tile around the bath only | Granite | £1,025 - £1,200 |
| Tile the splashback above the sink | Ceramic | £90 - £350 |
| Tile the splashback above the sink | Granite | £160 – £190 |
Supply Only Cost
When you add up the price of your tiles, don’t forget to buy tile for an area of about 10% more than you actually need. You need this extra because some of the tiles will need to be cut down to fit the shape of the room, so there is some wastage. The extra tiles also give you an allowance for breakages.
When looking at the price of tiles, you may see the price quoted in different ways. You will likely see both costs per tile and cost per m2. The cost per tile can be deceptive, so it is best to compare the price per m2.
TILE MATERIALS
Some tiles are only suitable for use on either walls or floors. You can get some styles that can be used in either place. In fact, most floor tiles can be used on walls. You should keep this in mind when you are picking out your tiles. There is not a consistent price difference between floor and wall tiles. Where they can be used is often determined by the type of material they are made from. Thus, the material choice is the bigger decider in cost.
To give a comparison of cost based on material alone, the table shows the costs of different types of tile. They are all mid-sized, unpatterned wall tiles. This is the supply cost and not the installation cost.
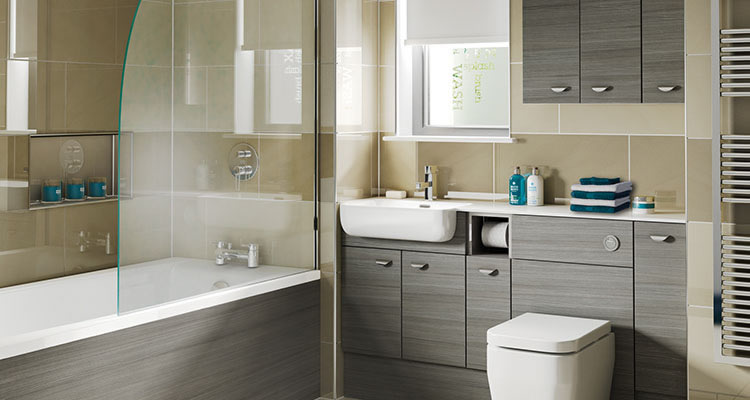
How to Install Tile on a Bathroom Floor
New floor tile is a relatively inexpensive way to add instant beauty and value to your home.
INTRODUCTION
An updated bathroom can add instant beauty and value to your home. A new floor tile is a relatively inexpensive way to get started and this DIY project can be completed over a weekend.
STEP 1
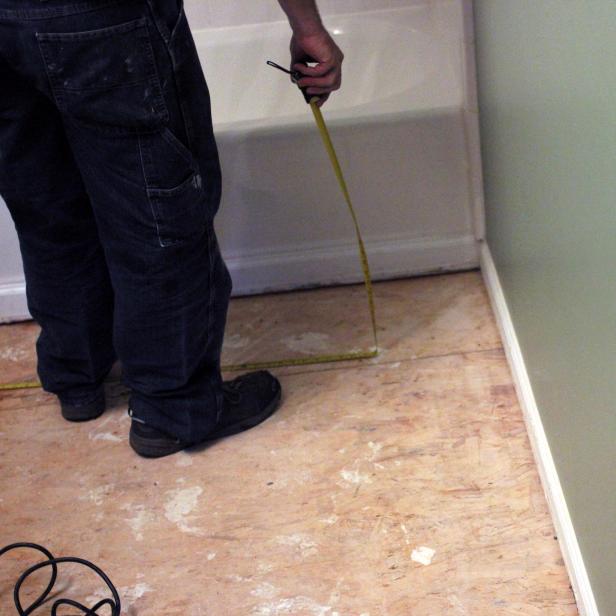
Measure Floor
Use a tape measure to determine how much tile, mortar, grout and backingboard will be needed. Purchasing the right amount of tile at the beginning of the job reduces the risk of mismatches in texture or color between production lots.
STEP 2

Prepare Underlayment
Attaching an underlayment of cement board to sub-flooring provides a level and sturdy surface to which bathroom tile can be easily attached. Using a circular saw, cut panels to fit measured bathroom and use a jigsaw to cut holes as needed to accommodate the toilet and other bathroom fixtures.
STEP 3
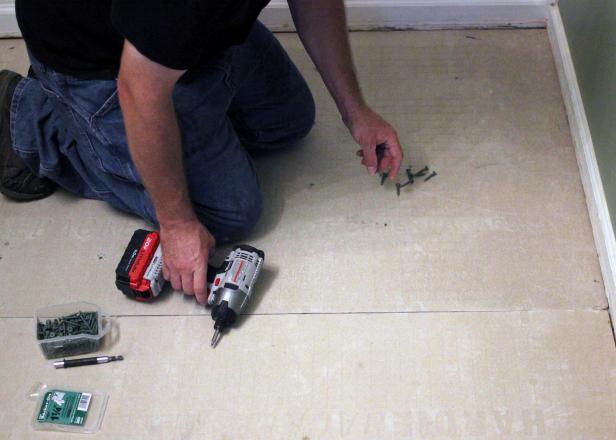
Attach Underlayment
Use a drill with driver bit to attach backerboard screws to underlayment to sub-floor. Space screws approximately 6 inches apart and make sure they rest flat once secured.
STEP 4
Determine Tile Layout
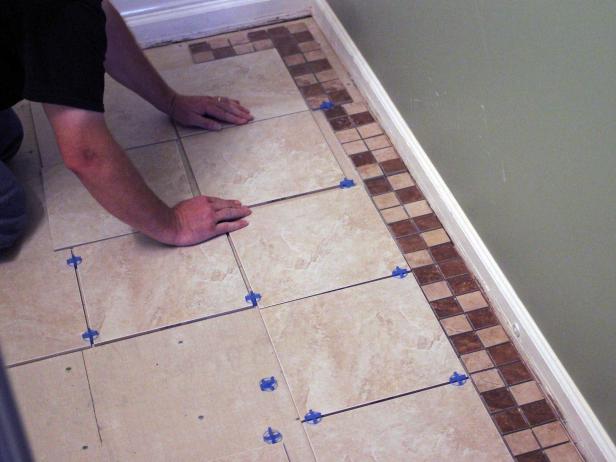
If using a contrasting trim, lay edge tile first. Then lay tile in a configuration that will use the most whole tiles and best fits the space. Use tile spacers to make sure tiles are square and evenly spaced. Position tiles to minimize visibility of tiles that must be cut to size. Once the best layout has been determined, measure tiles that must be cut to complete coverage.
STEP 5

Cut Tile
Use a tile saw to cut tiles necessary to complete floor.
STEP 6
Place Cut Tiles
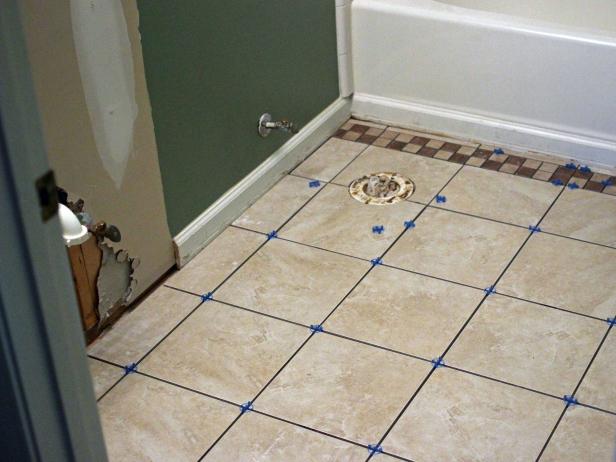
Place cut tiles to complete tile layout and confirm tiles are spaced evenly, are spare and that the layout is pleasing to the eye. Once satisfied with the layout, remove tile to apply thinset mortar.
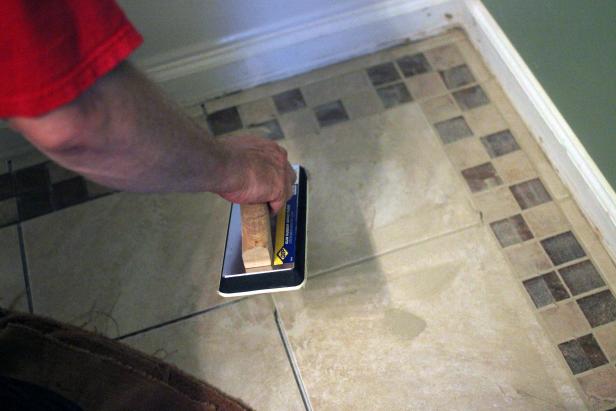
STEP 7
Apply Thinset Mortar
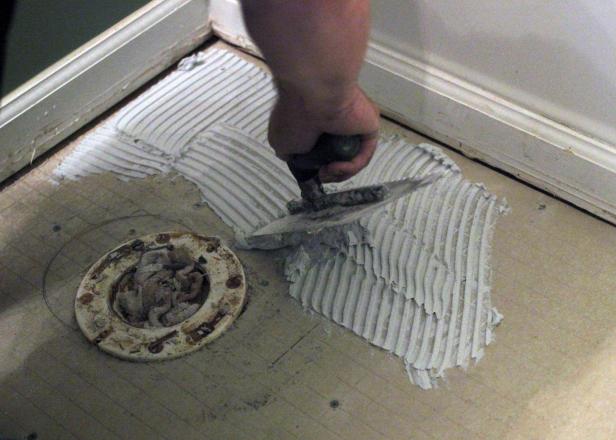
Apply a thin layer of thinset mortar to floor in small sections using a notched trowel. Replace tiles a few at a time, once again using spacers to help hold position.
STEP 8
Allow Mortar to Dry
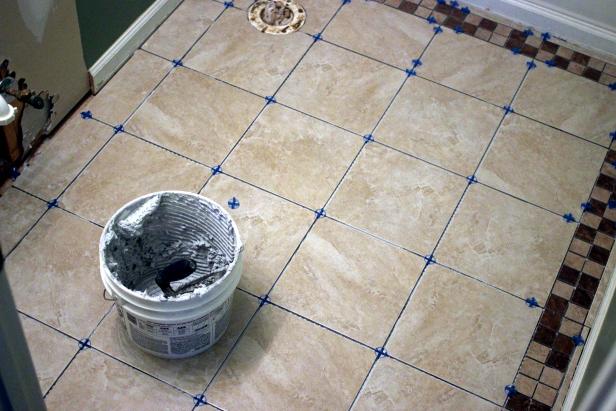
Once tiles are all in place, allow mortar to dry for 24 hours before continuing.
STEP 9
Apply Grout
Once mortar is dry, remove spacers, mix grout and use a grout float to completely fill spaces between tiles.
STEP 10
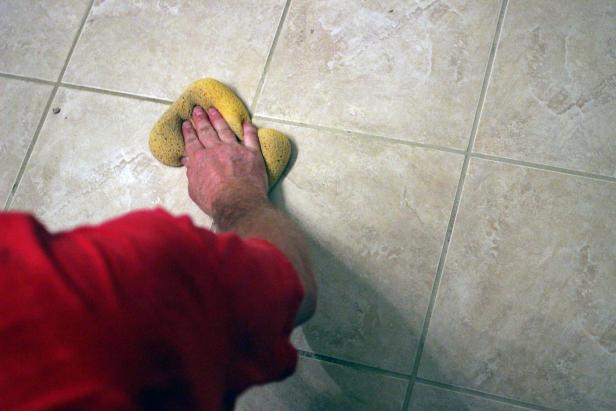
Wipe Away Excess Grout
Once grout has been completely applied, use a damp sponge to wipe away excess grout, leaving tiles clean and grout smooth and level. Make sure to be thorough. Grout left behind on tile results in “grout haze”, which can be difficult to remove once grout has set. Grout will be ready to walk on within 24 hours, although may take several weeks to fully cure.
STEP 11
Apply Grout Sealer
Once grout is dry, finish your weekend tiling project by applying a grout sealer to reduce staining and protect grout.
Tips to Help You Work From Home More Productively
Are you working from home? home improvement services
Let’s face it. Working remotely from home has some advantages. No early alarm setting. No commute. Pajama dress code. Saving money by eating lunch at home. No sitting in a confined office space. In other words, working from home can be rewarding and there are lots of ways to enhance your productivity from home. Here are some work from home tips as suggested by our remote Sears Home Services team:
Let the sunshine in.
Just because you are sequestered inside your home, does not mean it has to be in a dark place to work. Open the blinds. Open the curtains. Open the windows for fresh air. Are your windows working properly? If not, Sears Home Services handles window replacement and installation in your area.
Work in different locations inside your home.
Don’t be stuck working at a desk. Grab your laptop and move around your home. Work sitting on a comfortable couch. Sit outside on your balcony, porch or backyard patio. Even working at your kitchen counter can give you another great desk area. If your countertop needs refreshing, the experts at Sears Home Services handle countertops like solid surface, granite and quartz.
Keep your workspace neat.
The less clutter you have on your personal workspace, the more focused you will be on your work. Even looking at family photos, will take your attention away from the task at hand. If your desk is outdated and looking in rough shape. Give it a coat of paint and change the drawer handles for a clean, modern look.
Turn on some soothing music in the background.
There is no need to sit in silence. Turn on some relaxing tunes that will keep you calm and motivated. No need for earbuds because you are in the privacy of your own home. Try to avoid television as that will no doubt be more of a distraction.
Get showered and get dressed.
Yes, we all love the pajama dress code working from home. However, it is important to feel your best. Showering in the morning before you begin work will energize you and make you feel ready to face the work day. Looking to refresh your bathroom? Sears Home Services can help you with your bathroom remodeling and bathroom renovations.
Take a well deserved lunch break.
Don’t skip lunch! Close your laptop and take a break. Go for a walk. Take the dogs outside for some fresh air. Call a friend. Close your eyes and take a quick nap. Throw in a load of laundry. Empty the dishwasher. Turn on the TV and watch one episode of your favorite show. Make a quick run to the local grocery store. Check the mailbox.
Make a list of the work tasks that you want to complete for the day.
By making a list, you will keep yourself accountable for getting your work done. Working from home brings many distractions so you need to stay focused.
Check your daily calendar and meetings schedule.
Throughout the day, check to see if you have any meetings scheduled. It is important to be ready for a meeting by having the call in phone number or online meeting link handy. You don’t want to be that person who is late for the meeting. If you have dogs, be sure to take them outside before the meeting begins.
Turn off your work computer at the end of your shift.
Working from home allows you to be on call for more than a standard 8-hour work day. If your business environment is conducive, end the work day as you would if you were working in the office. Close your laptop and walk away. If there’s a work emergency, management will find you.
Readmore: 9 Kitchen Design Layout Ideas
9 Kitchen Design Layout Ideas
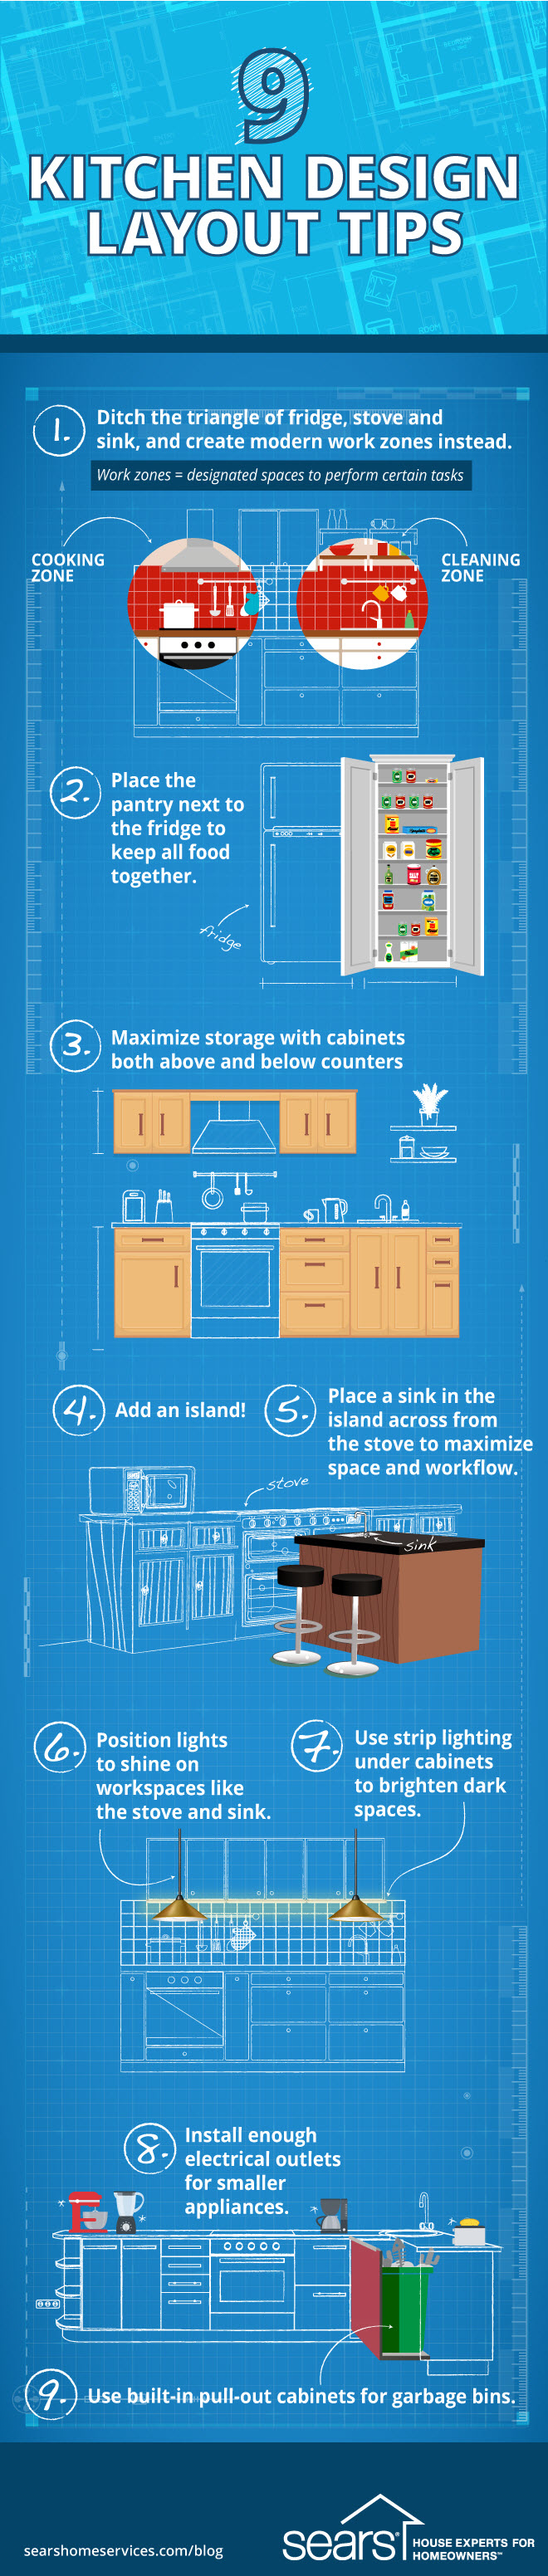
If you’re remodeling your kitchen, focus on efficiency and ease of use.
A kitchen remodel gives you the opportunity to start from square one and make your kitchen more efficient and user-friendly than it’s ever been. How? By thinking about the best way to design the space before the experts hang the first cabinet and lay the first tile.
Here are a few tips for home improvement services
making the most of your kitchen design layout.
-
Ditch the triangle of fridge, stove and sink. Instead create modern work zones—designated spaces where you do certain tasks.Carve out space near the stove for a cooking zone where you keep cutting boards, spices, mixing bowls, knives and other essentials. Create a cleaning zone in cabinets adjacent to the dishwasher and sink, for storing dishes and silverware.
-
Place the pantry next to the fridge to keep all food together.
-
Maximize storage with cabinets both above and below counters.
-
Add an island!
-
Put a sink in the island across from the stove to maximize space and workflow.
-
Position lights to shine on workspaces like the stove and sink.
-
Use strip lighting under cabinets to brighten dark spaces.
-
Install enough electrical outlets for smaller appliances.
-
Use built-in pull-out cabinets for garbage bins.